-
 Absolutes
-
 Active Complexes
-
 Actives and Peptides for Cosmetics
-
 Amino Acids
-
 Food Flavorings
-
 Ayurveda
-
 Vitamins
-
 Gelling Agents and Thickeners
-
 Hydrosols and Floral Waters
-
 Hydrolyzed Proteins
-
 Fragrant and aromatic substances
-
 Acids, Salts, Alcohols, and Alkalis
-
 Preservatives and Antioxidants
-
 Cosmetic Raw Materials
-
 Dyes, Pearlescents, and Glitters
-
 Face Masks, Scrubs, and Dried Flowers
-
 Oils, batters, macerates, oil mixtures
-
 Candle Supplies
-
 Melt and Pour Soap Bases
-
 Base for cosmetics, cream, serum, shampoo
-
 Fragrance Oils
-
 Surfactants
-
 Peelings for Skin
-
 Herbal Powders and Plant
-
 Silicones and Conditioning Surfactants for Hair
-
 Raw materials for dietary supplements
-
 Packaging for Cosmetics and Perfumes
-
 Molds, Packaging, Tools
-
 Organic Extracts
-
 Emollients for Cosmetics
-
 Emulsifiers
-
 Essential Oils
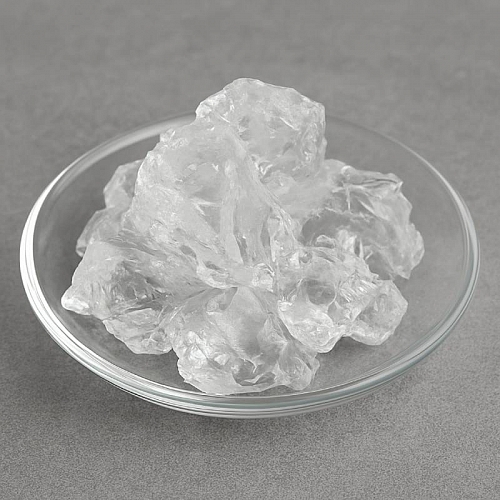
Clear Candle Gel: Unleash Your Creativity with Luminous Transparency
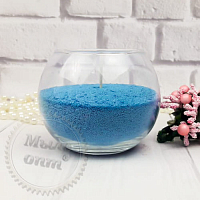
Discover the ultimate medium for crafting stunning, unique candles with our Clear Candle Gel, proudly manufactured in Ukraine. This transparent, gel-like substance is the perfect choice for creating intricate and visually captivating decorative gel candles. With its remarkable clarity and specific handling properties, our Clear Candle Gel opens up a world of possibilities for both hobbyists and professional candle makers.
Product Description and Key Features
Our Clear Candle Gel is a high-quality, transparent gelling agent designed specifically for candle making. Unlike traditional waxes, its unique gel consistency allows for the suspension of various decorative elements, creating a mesmerizing, almost aquatic effect. Its inherent transparency provides an excellent canvas for vibrant colors and intricate designs, making it a favorite for decorative candle applications.
Key Features and Benefits:
-
Exceptional Transparency: The most defining feature of this gel is its crystal-clear appearance, which allows light to pass through beautifully, highlighting any embedded decorations.
-
Optimal Melting Point: With a melting temperature range of +60 to +80°C, the gel offers a manageable working window, allowing for controlled pouring and setting.
-
Versatile Decoration: Its gel consistency is ideal for suspending a wide array of decorative elements, from sand and shells to beads and small figurines, creating unique underwater or miniature scenes.
-
Odorless: The gel itself is odorless, ensuring that any added fragrances are true to their scent and not affected by the base material.
-
Gel-like Form: Supplied in a convenient gel form, it's easy to handle and melt down for your candle projects.
-
Made in Ukraine: Sourced from a reputable Ukrainian manufacturer, ensuring quality and adherence to production standards.
Application Methods and Usage Areas
Clear Candle Gel is primarily used in the production of decorative gel candles, offering endless creative opportunities. Its unique properties require specific handling to achieve the best results, as detailed below.
Important Usage Instructions for Optimal Results:
-
Accelerating Melting: To speed up the melting process, cut the gel into small cubes before heating. This increases the surface area exposed to heat, reducing melting time.
-
Continuous Stirring Utensil: The tool used for stirring the gel must not be removed from the pot during heating. If a hot drop falls onto a hot surface, there is a high risk of ignition.
-
Pre-treating Decorative Elements: All decorative elements intended for suspension in the candle must be soaked in mineral oil for 5-10 minutes beforehand. This prevents air bubbles from adhering to their surfaces, ensuring a clearer final product.
-
Minimizing Air Bubbles: Stir the gel gently and continuously to avoid creating air bubbles. Excessive agitation can introduce unwanted bubbles that may remain visible in the finished candle.
-
Preheating Glass Containers: To prevent glass candle containers from cracking or shattering when the hot gel is poured, preheat them thoroughly in an oven or with a hairdryer. This equalizes the temperature difference and reduces thermal shock.
-
Wick Placement: Ensure the wick does not come into contact with any decorative elements. This can interfere with the burning process and potentially cause fire hazards.
-
Heat-Resistant Accessories: When selecting decorative elements, prioritize accessories that are not sensitive to high temperatures and fire. Avoid flammable materials.
-
Eliminating Bubbles (Post-Pour): To remove any remaining air bubbles from a freshly poured candle, place the container with the gel into a slightly preheated oven. This will keep the gel in a liquid state, allowing trapped air bubbles to rise to the surface and escape.
Melting and Pouring Process:
-
Melting: Melt the gel in a pot or double boiler, stirring constantly, until it reaches a syrup-like consistency. Bring the gel to a temperature of 90-95°C. Be aware that gel melts slower than paraffin wax, so this process will take some time.
-
Coloring: During the melting stage, you can add special gel dyes to achieve your desired color.
-
Wick Preparation: Install a reinforced wick in the candle container. Secure it to the bottom and fix the top using skewers placed across the container opening to keep it centered.
-
Fragrance: Before pouring, you can fragrance the gel with candle-specific scents.
-
Pouring: Once melted, pour the gel into the mold as quickly as possible. Pour gently, in a thin stream, and precisely in the center to minimize air entrapment.
Recipe: "Oceanic Dream" Decorative Gel Candle
Craft a captivating decorative gel candle featuring an underwater theme, perfect for adding a touch of serene beauty to any space.
|
Ingredient |
Quantity |
Function |
|
Clear Candle Gel |
100% (as needed for container) |
Main component, transparent base |
|
Reinforced Cotton Wick |
1 (suitable for container size) |
Fuel source for burning |
|
Decorative Elements (e.g., small shells, colored sand, glass pebbles, miniature fish figurines) |
As desired |
Visual appeal, theme creation |
|
Mineral Oil |
Small amount |
Pre-treatment for decorative elements |
|
Gel Dye (blue or green) |
Few drops (optional) |
Coloring the gel |
|
Fragrance Oil (e.g., "Ocean Breeze" or "Seaside") |
Few drops (optional) |
Aromatic enhancement |
|
Glass Candle Container |
1 (heat-resistant) |
Vessel for the candle |
Instructions for Making "Oceanic Dream" Decorative Gel Candle:
-
Prepare Container: Ensure your glass candle container is clean and dry. Preheat it in an oven at a low temperature (around 60-70°C) or with a hairdryer to prevent cracking when the hot gel is poured.
-
Prepare Wick: Secure the reinforced cotton wick to the bottom center of the container using a wick sticker or a drop of hot gel (applied carefully). Use skewers or a wick holder across the top of the container to keep the wick centered and upright.
-
Prepare Decorations: Soak all decorative elements (shells, sand, pebbles, etc.) in a small amount of mineral oil for 5-10 minutes. This helps prevent air bubbles from clinging to them when embedded in the gel.
-
Melt Gel: Cut the Clear Candle Gel into small cubes. Place the cubes in a heat-resistant pot or double boiler. Melt the gel slowly over low heat, stirring gently and continuously with a dedicated stirring tool that remains in the pot. Heat the gel to 90-95°C until it reaches a syrup-like consistency.
-
Color and Fragrance (Optional): If desired, add a few drops of gel dye to the melted gel and stir gently to incorporate. Then, add a few drops of fragrance oil and stir again.
-
First Pour and Decoration: Pour a small amount (about 1-2 cm) of the melted gel into the preheated container. Carefully place some of your pre-treated decorative elements into this first layer. Allow this layer to set slightly, enough to hold the decorations in place but still soft enough for further pouring.
-
Subsequent Pours and Layering: Continue pouring the gel in layers, adding more decorative elements as desired. Pour slowly and steadily into the center to minimize air bubbles. Ensure the wick remains centered and does not touch any decorations.
-
Bubble Removal (Optional): If air bubbles are visible after pouring, carefully place the container with the freshly poured gel into a slightly preheated oven (around 80°C) for a short period. This will re-melt the gel slightly, allowing bubbles to rise to the surface. Monitor closely to avoid overheating.
-
Cooling and Curing: Allow the candle to cool and solidify completely at room temperature. This may take several hours or even overnight.
-
Trim Wick: Once fully hardened, trim the wick to about 0.5 - 1 cm above the gel surface.
Recommendations for Use:
-
Safety First: Always work in a well-ventilated area. Never leave melting gel unattended. Keep flammable materials away from the heating area.
-
Container Choice: Always use heat-resistant glass containers specifically designed for candles.
-
Bubble Control: Patience and gentle stirring are key to minimizing bubbles. The pre-treatment of decorations and post-pour oven method are highly effective for achieving a crystal-clear finish.
-
Decorative Element Selection: Choose non-flammable, heat-resistant decorations. Avoid plastics that can melt or release harmful fumes.
-
Storage: Store finished gel candles in a cool, dry place away from direct sunlight to prevent softening or discoloration.
-
Burning: Always burn gel candles on a heat-resistant surface. Never burn a gel candle for more than 4 hours at a time. Keep away from drafts and out of reach of children and pets.
And also go to the Blog from Мыло Опт, where we share useful information about creating the right natural cosmetics
| Other | ||
| Application | decorative gel candles | |
| Color product | transparent | |
| Descriptio smell | absent | |
| Features | All information presented on the site is for reference only | |
| Input percentage | Расплавить гель до консистенции сиропа в кастрюле или на водяной бане, все время помешивая гелевую массу. Доведите гель до температуры 90-95С. Учтите, гель плавится дольше парафина, так что на это уйдет достаточно много времени. На этапе плавления в массу можно добавить специальные гелевые красители. Установите армированный фитиль в емкость для свечи, приклейте его ко дну, а верх зафиксируйте при помощи шпажек, установленных поперек емкости. Перед заливкой можно ароматизировать гель при помощи отдушек. После расплавления как можно быстрее залейте гель в форму. Лейте аккуратно, тонкой струйкой и точно по центру. | |
| Melting temperature | +60 + 80 ° C | |
| Minimum count | 1 | |
| Name | Transparent Jelly Wax 1 L | |
| Packaging | container for transportation | |
| Packing | 1 liter | |
| View | gelatinous | |
| Valid until | не ограничен | |
-
Date:todayAuthor:Степан, КиевReviews
Отличный выбор и приятные цены.




 Add to cart
 Buy in 1 click

 Add a review
 To favorites
 To compare


